
Deciding between the LL120 vs ML120 fans can be a bit confusing, especially if you’re weighing their RGB optimization and cooling speeds. While both fans offer excellent cooling performances, they both have unique specs that set them apart from each other.
 We’ll be taking a look at the similarities and differences between these two RGB LED PWM fans to help you determine the ideal one for you. Without further ado, let’s get right to it!
Contents
LL120 vs ML120 Comparison Table
| Features | Corsair LL120 |
Corsair ML120 |
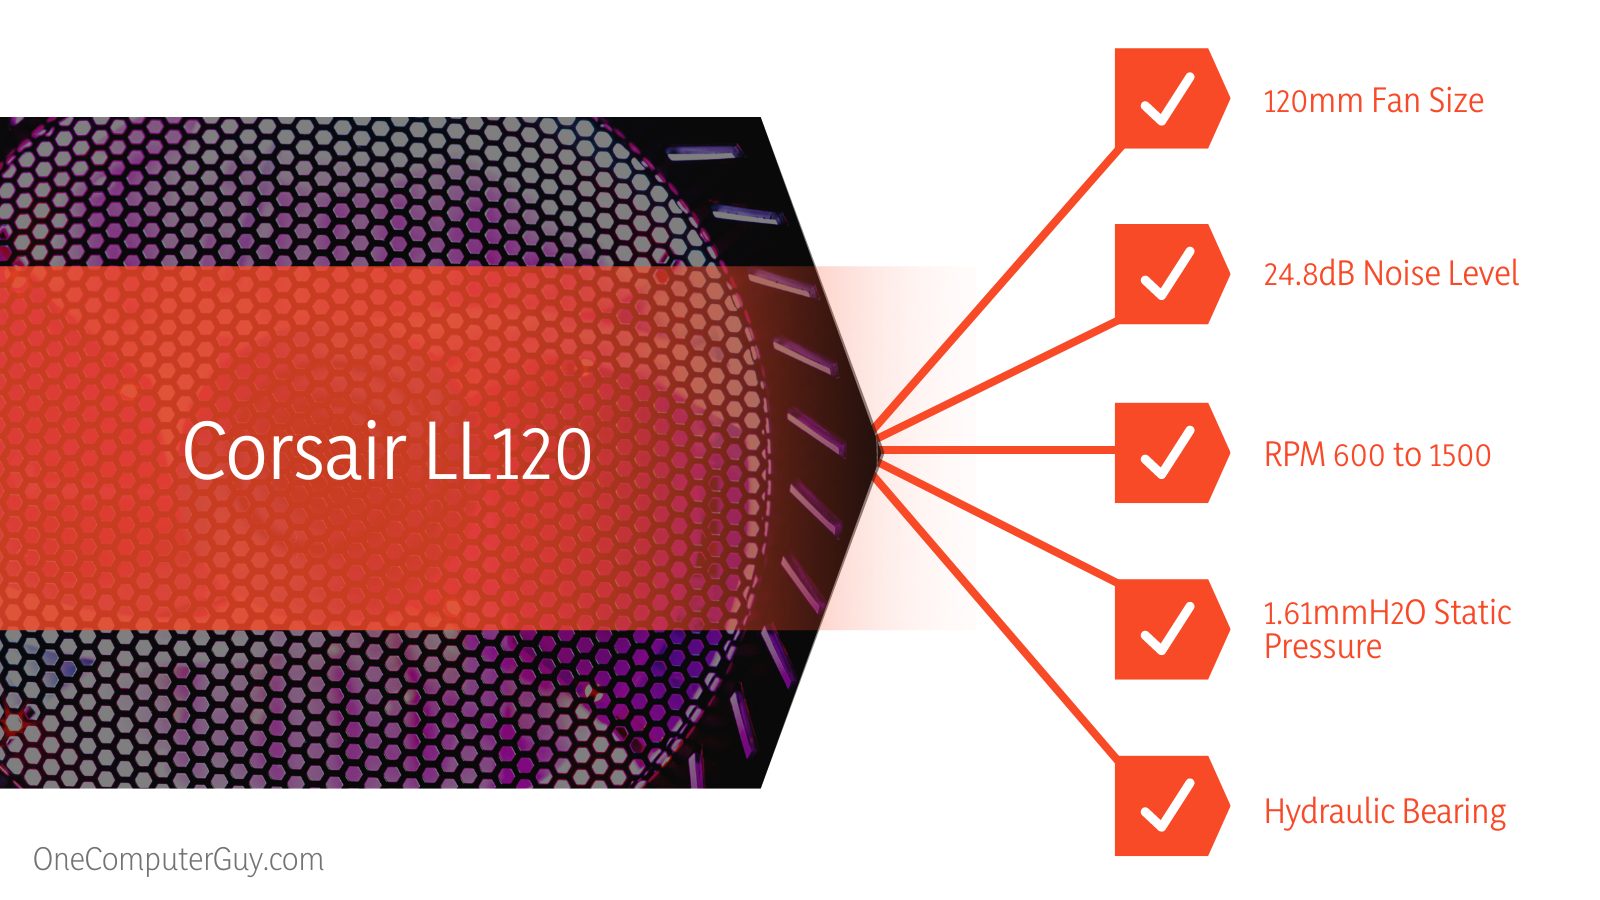
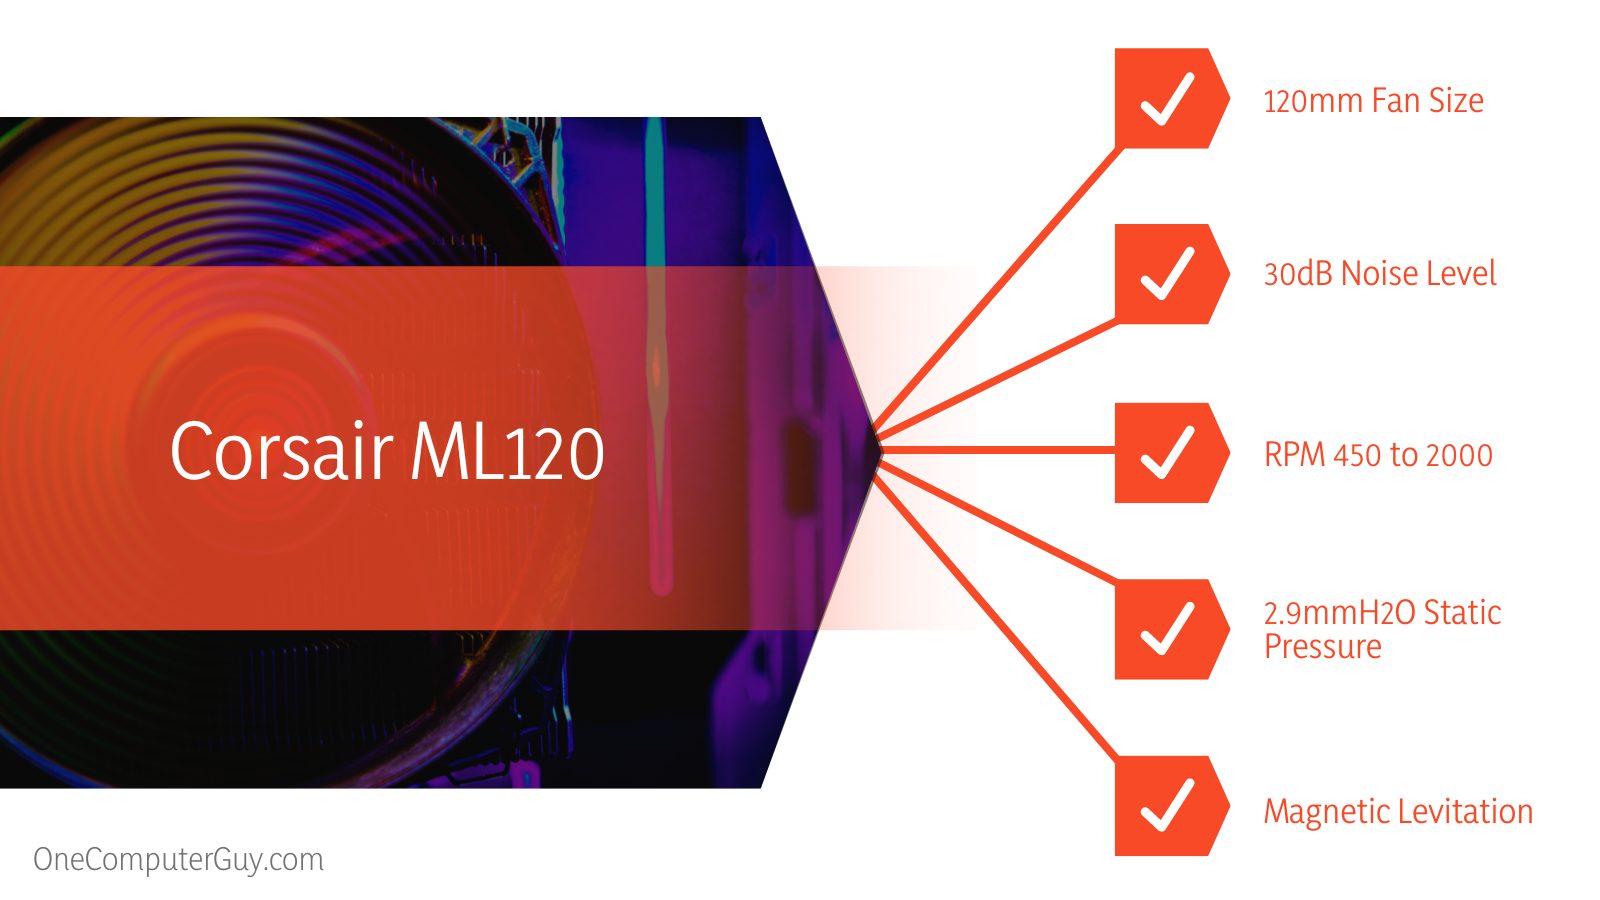
| Fan Size | 120mm | 120mm |
| Available Colors | Black only | White and Black |
| Noise Level | 24.8dB | 30dB |
| RPM | 600 to 1500 | 450 to 2000 |
| PWM Support | Available | Available |
| Static Pressure | 1.61mmH2O | 2.9mmH2O |
| Connector | 4-pin PWM and Proprietary RGB | 4-pin PWM and Proprietary RGB |
| Fan Technology | Hydraulic Bearing | Magnetic Levitation |
What Are the Differences Between LL120 vs ML120?
The main difference between LL120 vs ML120 is that the ML120 uses premium magnetic levitation technology to provide users with excellent performance at low noise while the LL120 uses hydraulic bearing technology and has a light loop that’s sure to improve the aesthetics of your rig.
What Is LL120 Fan Best For?
The LL120 is the best fan for those who are looking for premium cooling performance and excellent RGB effects without sacrificing their noise levels. They come with over ten cooling effects and since their RPM is only up to 1500, they run quietly even at max load.
– Features
Since its inception, the LL120 has been a favorite among PC builders because of its low-noise performance and RGB lighting effects. The LL120 RGB fan kit comes with two RGB fans and an RGB lighting control hub that connects to your fans and powers the RGB lighting.
You also get an RGB lighting node pro, to which the lighting hub will be connected to. Next is the USB connector that connects the lighting node pro to a USB header on your PC’s motherboard and a different cable that connects the lighting hub to the lighting node pro.
– Setting Up
Many people find it hard to choose the LL Series fans because most of them come with no documentation. This lack of instructions applies to the Corsair LL120 RGB RGB LED fans as well.
Since there’s no one way to install a fan as each system has its own unique airflow setup, we’ll be giving you an overview that’ll help you understand how the setup should be while explaining the accessories attached to the fans.
 – Fan Connectors
Now, when you look at the cables on the LL120, you’ll notice that there are two different connectors on the fans. One is the 5V addressable RGB connector while the other is the PWM connector. The 5V RGB connectors are unique to Corsair but since they are addressable and work with 5V connectors, you can easily fix them to your rig.
– Lighting Control Hub
The lighting control hub, popularly known as the splitter, features a three-pin connector on one end; the three-pin connector is what connects the hub to the lighting node pro. On the side of the splitter, you’ll have the addressable connectors for the fans with the numbers one to six.
You’ll need to take note of how you connect your fans to these connectors as the arrangement would be what will determine how the RGB lights work.
– Lighting Node Pro
Next is the lighting node pro, which has two lighting channels on one side. These lighting channels are labeled one and two and you’ll need to keep the labels in mind as they’ll come in handy when configuring the iCUE software.
The other side of the lighting node pro has the USB connector, which connects to your motherboard via the USB cable that comes with the kit. One end of this USB cable is mini-USB while the other end features a nine-pin USB header. Also, there’s a SATA power connector that powers the lighting node pro.
– Setting Up the Fan and Connectors
Take the three-pin cable that connects the lighting control hub and the lighting node pro and connect one end to the lighting control hub and the other to one of the channels in the lighting node pro.
How you connect the cable doesn’t matter as both ends of the cable have the same headers, and since you won’t be plugging anything else in the lighting node pro, we recommend that you connect the cable to the first channel.
Next, take the mini-end of the USB cable and connect it to the lighting node pro connector then plug the nine-pin USB header end into a free USB 2.0 header on your motherboard. Doing so will make it easy for you to utilize the software control.
Once you’ve done that, take the lighting connector that’s attached to the fan and plug it into any of the ports labeled one to six on the lighting control hub. Take note of the label here as it’ll be vital to the light control. We recommend that you do it in a sequence to make it easy for you to remember.
Next are the PWM fan connectors, which can be connected depending on your rig. You can connect them to an AIO to use your fans as cooling fans, directly to your motherboard, or connected to a fan hub.
Now plug the SATA power connectors into your PSU and turn on your system. Your fans should start working and the RGB should light up immediately.
– Setting Up the Software
Once the fans are connected to the lighting hub, lighting node pro, and your PC, the next step is setting up the software for your fans. You can do that by following the steps listed below:
- Go to Corsair’s website, download the iCUE software, and install it.
- Once installed, launch the software and select Lighting Node Pro.
- Navigate to the “Lighting Setup” tab on the left and click on it.
- You’ll have new options under “Lighting Setup” on the bottom part of the right window.
- Click on the appropriate “Lighting Channel” you connected the control hub to on your lighting node pro.
- Choose “LL RGB Fans” on the next window and one of your fans should light up.
- Click on the new drop-down menu beside the Lighting Channel dropdown menu and select “Two fans” or “Three fans” or any other option depending on your setup.
- All of your fans’ RGB lights should come alive once that’s done.
- You’ll get a new option that correlates with the chosen lighting channel so if you installed your fans on lighting channel 1, the new option would be Lighting Channel 1.
- Click on this option and you’ll be able to change the different color effects for your fans.
– Performance
Thanks to the fact that LL120s support PWM, they are ranged fans as they can be controlled to provide speeds from zero to 100 percent. This means that you can utilize them at zero RPM and make them run at their full capacity of 1500 RPM.
You can set them up so they don’t spin until they’re needed, which allows you to enjoy an extremely quiet setup if your case isn’t too hot. This zero RPM ability makes them a good choice as cooling fans for AIOs. In terms of airflow, the LL120s do a good job as they’re able to attain 1.61mm static pressure and a fan airflow of 43.25 CFM.
What Is Corsair ML120 Best For?
The Corsair ML120 is the best fan for superior cooling performance. While the LL120s provide good airflow, the ML120s take it up a notch by providing higher RPM, static pressure, and better airflow. Although they aren’t as attractive as the LL120s, they look good and provide better efficiency.
 – Features
Since there are many variations of the ML120s, we’ll be using the ML120 Corsair iCUE RGB Elite fans as our base. The ML120 comes with the same set of accessories that’s on the LL120s, including the fan connectors, lighting connectors, and lighting control hub.
However, the ML120 looks different with elevated fins that provide targeted and generally better airflow than the LL120s. This feature makes them the ideal fans for both cases and radiators.
Also, both fans are aesthetically different. While the LL120s focus on looking pretty and providing cooler RGB lighting with more RGB lights on them, the magnetic levitation 120s are all about providing excellent airflow so they don’t have as many lights as the LL series.
Additionally, the LL120 RGB lights form a ring on the outside of the fan while those of the Corsair ML120 RGB Elite focus on the fans.
Note that you can only get the RGB lighting control hub from Corsair if you purchase three packs of ML fans. The control hub offers the same features as the LL120 control hub as it allows you to plug and control the RGB lights of up to six different fans.
The fans themselves feature two cables with one connecting to the motherboard or fan control unit and the other connecting to the RGB control unit.
– Performance
The ML120s are also fans that support the PWM technology, which means that you can configure the fan to come on only when they are needed. In terms of airflow, the ML120 RGB Elite fans provide up to 58.1 CFM and improved static pressure of 2.9mm.
This means that you’d get better cooling and airflow from the ML120 than you would on the LL120s. Also, thanks to the guided fins of the ML120s, you’ll get better-targeted airflow throughout the case though the fins don’t make for excellent aesthetics.
These fans run at low noise even at high loads; however, the ML series are louder than the LL120s. The ML 120s can go up to 30 decibels while the LL120s max out at 24.8 decibels. Yes, the ML120s are louder but that’s because they spin faster at higher loads and can reach up to 2000RPM compared to the max 1500 RPM of the LL120s.
 – Setting Up
The setup of the ML120s requires the same process as the LL120s. All you have to do is plug the fans into the RGB lighting control hub, the control hub to the lighting node pro, and connect all power connectors to their motherboard and PSU headers as we’ve explained above.
Conclusion
As you can see from our discussion above, while the LL120s offer good airflow, they don’t come close to what you get on the ML120s with targeted airflow, better RPM, high performance, and improved static pressure. If you have an AIO or building a multi-fan setup and are keen on making your rig as aesthetically pleasing as possible, the LL120s are a good set of fans to work with.
They have fuller RGBs than the ML120s and offer excellent low-noise performance. However, if you lean towards better performance and superior airflow but would like some RGB lighting thrown in the mix, then the ML120s are the options you want to go for.


