To unpark CPU you can do so in four main ways and one is entirely automatic.
Although it sounds pretty straightforward, the overall process can cause serious headaches when you’re unaware of the appropriate approach.

In this article, we’ll guide you through four amazing ways with which you can effortlessly manage parked CPU cores.
Contents
- Step To Take Before The CPU Unparking Process
- How To Unpark CPU: Top Four Ways To Do It
- – Before You Begin: Checking the Parked Status
- – First Method: Unparking Cores With Windows Registry Editor Manually
- Step 3: Altering the Registry
- – Second Method: Unpark CPU Cores Using the Automatic Approach
- – Third Method: Manage Parked CPU Cores Using ParkControl Utility
- – Fourth Method: Unpark CPU Utility Using QuickCPU
- Understanding The Process
- Is It Safe?
- Conclusion
Step To Take Before The CPU Unparking Process
The following process is something you absolutely need to do before you unpark your CPU to ensure that you have a restoration point.
– Creating a Restore Point
Creating a restore point is always a good idea, especially when you’re about to bring alterations to the working state of your system. Just as its name suggests, the restore point mirrors the exact state of the operating system before it undergoes any form of alteration and saves the same for future usage.
Here are the steps to take to create a restore point:
- From your desktop, navigate to the Windows icon and click on it.
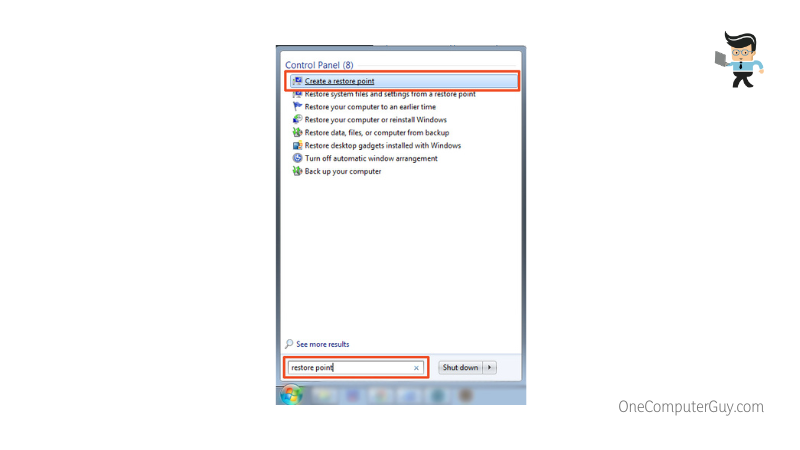
- Search for the term “restore point” and click “Create a Restore Point” as it pops up.
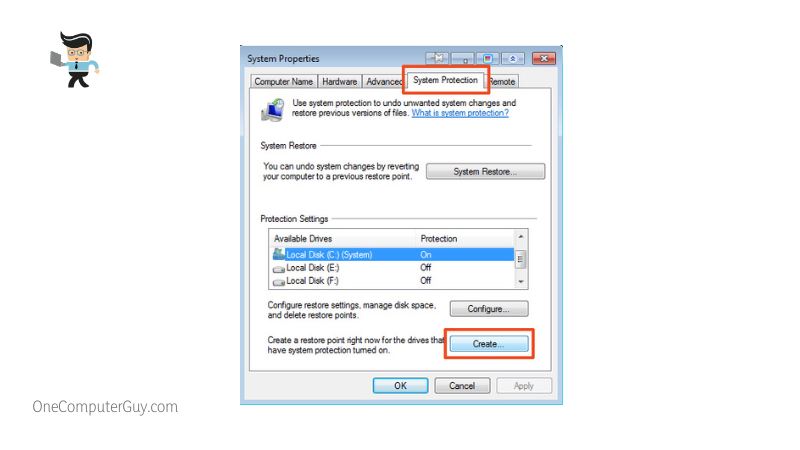
- Under the menu that appears, tap System Properties, followed by System Protection.
- Click the desired drive (one that contains your system files) and hit the Configure button.
- After that, turn on the System Restore utility.
- Finally, click on the button that says Create and follow the onscreen instructions.
Now, you are ready to unpark your CPU since you have a restore point to go back to!
How To Unpark CPU: Top Four Ways To Do It
Now that you’ve all the necessary information revolving around unparking cores sorted, it is time we walk you through the methods involved. Talking about the methods, there are, in general, two forms of approaches, manual and automatic. While the former uses the Windows registry editor (popularly known as REGEDIT) to unpark CPU cores, the latter employs third-party applications.
Moreover, we are going to let you know about two other ways to do it employing tools, in addition to the standard methods. Read on to find them out!
– Before You Begin: Checking the Parked Status
Before you begin with either of the approaches (manual or automatic), knowing about the status of your CPU cores is crucial. In other words, you must have a fair idea about the parked CPU cores and the ones you need to unpark.

Although it sounds a bit technical, there are several ways with which you check the CPU’s parked status pretty easily:
- The first thing you’ll need to do is download any tool that serves the desired purpose. We recommend going for the one called the CPU Unparking tool.
- Once downloaded, extract the zip file to your computer.
- From inside the directory, find and run UnparkCPU.exe.
- Look for the option that says “Check Status.”
- Now, wait for a few seconds until the tool displays the parking status of all the cores.
– First Method: Unparking Cores With Windows Registry Editor Manually
As already mentioned, Windows Registry Editor corresponds to unparking cores manually. Moreover, follow the steps below and learn how you can effortlessly manage parked CPUs.
-
Step 1: Run the Windows Registry Editor
Start by running the Windows Registry Editor on your PC/laptop. For that, hit the Windows + R key combination and launch the “Run” box. From there, input REGEDIT (exactly the same way) followed by hitting the Enter key. This should launch the Windows Registry Editor.
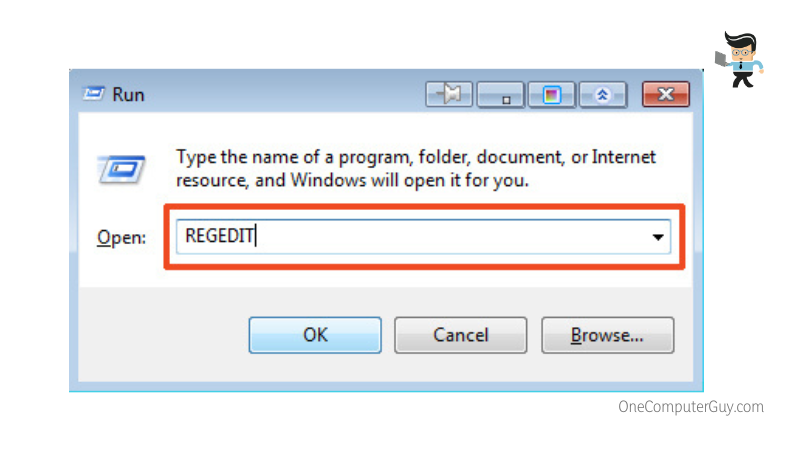
In case it doesn’t, make sure to repeat the process carefully.
-
Step 2: Navigate to the Required Destination
Once you’re inside the Windows Registry Editor, the next thing to do is hover over to the required destination. Now, this step is usually a complicated one, but we’ve structured the most flexible approach to make sure you don’t encounter any form of trouble.
Look for the “Edit” tab and click on it. From the menu that pops up, hit “Find.”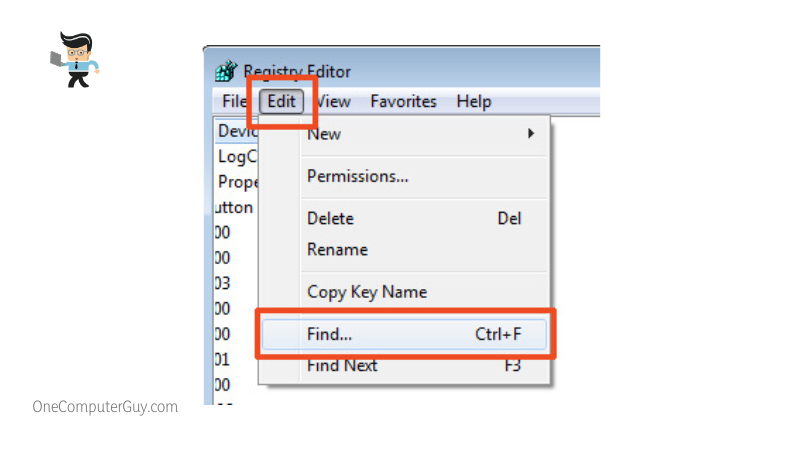
After that, navigate to the search box and copy-paste the following text into it, and then click “Find Next:”
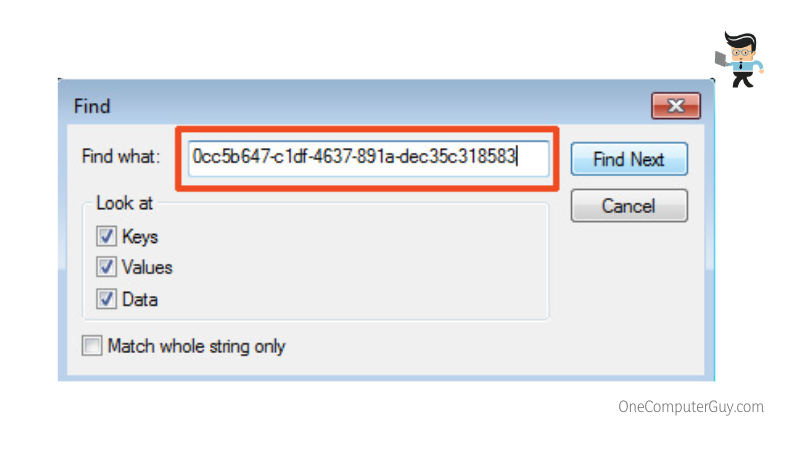
0cc5b647-c1df-4637-891a-dec35c318583
-
Step 3: Altering the Registry
As soon as you’ve completed the search, it is time you start unparking cores by bringing necessary edits to the registry file. In case you don’t have any idea about how these files work, keep in mind that you’ll only need to alter values that sit inside “ValueMax” and “ValueMin. ”
At first, change the value in the “Value data” box and assign “0” (zero) to it. Click “OK” and repeat the process for “ValueMin.”
-
Step 4: Reboot Your System
Finally, reboot your system to apply the changes that you made.
-
Step 5: Checking the Core Status One More Time
To make sure that you’ve successfully concluded the process, run the CPU Unparking Tool one more time. Similar to what you did before starting the process, find and hit the “Check Status” button; it will now display that the cores are unparked.
There you have it!
This is how to unpark CPU cores using the Windows Registry Editor utility.
– Second Method: Unpark CPU Cores Using the Automatic Approach
Remember the CPU Unparking tool? The one that we’ve used so far to check the status of parked cores?

Well, the same can be employed to unpark CPU cores with a click of a button. Yes, you’ve heard it right; the CPU Unparking tool is a unpark CPU utility that takes away all the manual hassle by automating the process involved in altering the nature of parked CPU cores.
Considering the fact that you’ve already downloaded the file, here is a quick guide to use CPU Unparking and manage parked CPU cores:
- Navigate to the directory where you’ve extracted the downloaded CPU Unparking zip
- Look for the file that says “UnparkCPU.exe” and double click on it.
- From the screen that pops up, tap the option that says “Unpark All.”
- Now, reboot your system to apply the changes, and that is pretty much how you unpark CPU cores in a matter of minutes.
– Third Method: Manage Parked CPU Cores Using ParkControl Utility
With ParkControl, you’re looking at an open-source utility that displays the CPU core parking status in real-time. Sheltering a wide range of complimentary power automation features, the tool can help you promisingly unpark CPU cores without facing any issue whatsoever. Apart from that, it also lets users bring necessary tweaks in how the CPU cores are set to work.
Here is how to use it:
- Download and install the ParkControl utility.
- Launch it and right from the home screen navigate to CPU Parking
- Choose the desired CPU settings for power profile and hit “Make Active.”
- Under “CPU Parking,” look for the option that says “On AC” or “On Battery” followed by clicking “Enable
- Now you can either enter a Custom Core Percentage (%) or simply drag the widget in the forward direction to make sure the core is more tending towards an unparked state.
Quick Note: You may see other options like Free Scaling AC, Free Scaling DC. Simply repeat the process.
- Once you’re satisfied with the level, click “Apply” and “Ok.”
- Finally, tap on Resource Monitor under Task Manager, navigate the CPU menu and check core parking status.
– Fourth Method: Unpark CPU Utility Using QuickCPU
QuickCPU by CoderBag is one of the most versatile core unparking utilities available to date. Available for free, you can visit the official website and download the zip file on your PC. Once done, you’re ready to extract the downloaded file, find and double-click on the .exe file and install it.

Are you already done with the installation process?
In that case, have a look at the guide below and learn how to unpark CPU cores on Windows 10, 8, 7, and even on the latest Windows 11 system with ease:
- Launch the app and choose the desired power plan.
- Have a look at the bottom left end of the QuickCPU home screen to find the Core parking option.
- Take the cursor to the slider and drag it until the preferred point.
- Finally, hit Apply, and you’re done.
Understanding The Process
No matter if you’re a mild tasker or the intensity of the day-to-day task you wish your computer to perform rests on the heavier end, a willingness to have your system ready to operate at its full capability is common. But sadly, it seems as if the operating system thinks about it the other way around, and this is why it tends to shut off specific cores when they’re not in use.
Altering a few settings in the power management section will, however, make sure that the cores are never parked; instead, they are ready to execute tasks.
Is It Safe?
The answer is a straightforward ‘yes’. No matter what kind of CPU we’re talking about, the cores are meant to run simultaneously. To put it in simple words, you can proceed and unpark CPU cores without worrying about negative impacts as there are merely any.
The only drawback that you might encounter in the long run is high power consumption. However, expecting this is pretty evident when you decide to have the CPU cores all guns blazing.
Conclusion
This is pretty much everything about unparking cores and managing parked CPUs. Here is a quick summary to make sure you efficiently get hold of the vital points that I’ve discussed in this article:
- Unparking CPU cores is completely safe. It will help you bring the most out of your hardware
- Before you decide to unpark CPU, it is better to create a system restore point so that it can help you in the future (if required)
- You can manually unpark CPU cores by launching Windows Registry Editor and altering the registry values
- For automating the unpark process, you can employ tools like CPU Unparking, ParkControl, QuickCPU, and more
- Every time you make alterations in the core status, it is crucial you reboot the system and apply the changes made
The best answer for “how to unpark CPU” is actually an easy one, provided you’re well aware of the processes involved. So to ensure you don’t get yourself in trouble, follow the most user-friendly guide that we’ve created here.


