
If you want to know how to screenshot on Asus laptop, you aren’t alone. While many computers have screenshot options readily available as a hotkey on the keyboard, most Asus laptops don’t.
 There are many reasons for this, including the fact that screen capturing isn’t as popular as it once was, computers are becoming increasingly touchscreen. Still, if you need to take a screen grab, it can be quite a lengthy process.
If you want to take a screenshot on Asus laptop and want to do so quickly (or you just want to have a shortcut because you do it frequently), continue reading our guide to learn about a few methods. Pick the one that works best for you!
Contents
- How To Screenshot on Asus Laptop: Here Are a Number of Ways
- How To Take a Screenshot of the Whole Screen Without Software
- Take a Screenshot of the Active Screen Without Software
- Take a Custom Screenshot Without Software
- Take a Screen Recording Using Game Bar
- Take a Screenshot in Tablet Mode
- Screenshot Etiquette
- Conclusion: It Is Easy To Take a Screenshot on Asus Laptop
How To Screenshot on Asus Laptop: Here Are a Number of Ways
If you are looking to take a screenshot on an Asus computer, you have a plethora of options. Whether you want to take a screenshot on Asus Zenbook, a desktop computer, or another type of laptop, these options should work for you. Some are better suited for certain models, and we will point out when a tool works better for one device than another.
Remember that these are just a few ways to take screenshots and there are more options out there, but they aren’t as user-friendly, cost money, or aren’t worth downloading.
-
Use Lightshot Software
Lightshot software is a fantastic option for someone who needs to take screengrabs on a routine basis. It has a nice set of tools that helps you to explain something, mark up the screenshot, and share it.
This tool is free and you can download it from their website. Once downloaded, all you have to use is your print screen key or you can use the icon to take the screenshot.
Once you have the screenshot, you can use their image editing features to mark it up and give someone instructions. You can adjust the screenshot as you go as well, which is extremely helpful. There are arrow tools, boxes, lights, pens, text, and more options to put over your screenshot.
Once you finish marking it up, you can copy it, save it to your computer, search Google for similar images, and upload it to the Cloud.
-
Use Snagit (for Videos)
Snagit is a tool similar to Lightshot which allows you to take screenshots and then mark them up and edit them. These tools are both great, but Snagit actually takes video screenshots as well, which can be helpful. The video tool is a little more complicated to use, but it isn’t impossible.
To take a video screenshot, follow these steps:
- Install Snagit, run it, and sign in
- Click and drag to select a custom area and then release your mouse
- Edit using the resulting pop-up that comes once you’ve released your mouse
- Press “Ctrl + S” to save it
The biggest problem with Snagit is that it isn’t free, whereas Lightshot is. You will get a 15-day free trial and then you will have to pay after.
-
Use the Windows Screenshot Tool
The most obvious option is to just use the Windows screenshot feature. This is free and included with all Asus laptops and devices, but it is extremely limited, especially compared to the last two options. Still, it comes pre-downloaded so you can use it in a pinch.
You don’t get as much customization with this tool, but you can take a screenshot of your entire screen, of an active window, or a custom screenshot.
To use this tool, you can either search for it or click on the icon that is usually on the status bar. It looks like a pair of scissors in front of a white circle. Double click on it, and the tool will pop up. Follow the wizard to get your screenshot.
How To Take a Screenshot of the Whole Screen Without Software
If you don’t want to worry about any key combinations, programs, or interfaces, there are some easy steps you can take to
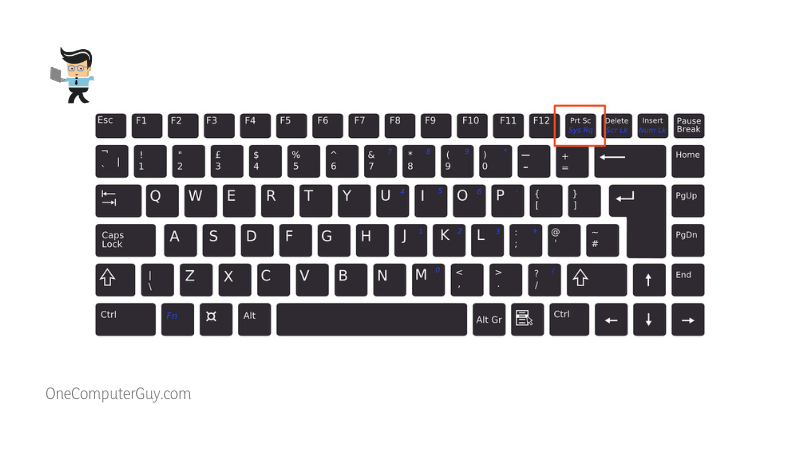
- Press the “PrintSc” key to take an instant screenshot of the whole screen. This will copy the image to the clipboard.
- For Windows 8 and Windows 10, press on the Windows logo key and the “PrintSc” key at the same time to capture the whole screen. This will also copy the image to the clipboard.
Saving It Via Paint
Next, you can paste the image into just about anything that accepts pasted images, like Skype, GoogleDocs, and more.
If you want to save the image to your computer, edit it, or send it as an attachment, do the following:
- Search for Paint on your desktop
- Click on the Paint program to open it
- Once everything has loaded, use “Ctrl + V”
- This will paste the screenshot into the Paint program, automatically adjusting the borders to fit the image
- Once you have done any edits you want to do, press “Ctrl + S” to save the image to your desktop.
Saving It Via Windows
If you don’t want to go through all of those steps, there is an easier method that will allow you to save the raw screenshot without editing it. Press on the Windows logo key and “PrintSc” key to take a screenshot on Windows 8 and Windows 10 only.
Once you do this, the screenshot will automatically get copied to your clipboard and it will be saved in the path: C:Users[Your Name]PicturesScreenshots, unless you are using OneDrive to sync your pictures folder. If this is the case, it will save to C:Users[Your Name][Your OneDrive folder name]PicturesScreenshots.
The good thing is that it will also save to your clipboard, so you can paste it into Paint and make edits as needed. Then, you will have an “original” and “edited” version of the screenshot, if necessary.
Take a Screenshot of the Active Screen Without Software
If you want to take a screenshot of the window that you are currently using (aka the active window) on your Asus laptop, follow these steps:
- Click anywhere inside of the window you want to take a screenshot of
- On the keyboard, press “Alt + PrintSc” at the same time to take your screenshot
- Open up the Paint program and paste it by pressing “Ctrl + V”
- Make any edits you want to make
- Press “Ctrl + S” at the same time to save the screenshot.
 This will only take a picture of the active window, meaning you won’t get your taskbar, any open notes apps, or any widgets in the screenshot. It will also eliminate tabs, which can help you keep your privacy.
Take a Custom Screenshot Without Software
If you want to take a custom screenshot, meaning you only want a screenshot of a specific area on the screen, you can do so without downloading any software in Windows 10 only. You will be using the Snipping tool, which is an easy way to make small edits and get the precise screenshot you want.
To do this, follow these steps:
- On your keyboard, press the Windows Logo key, Shift, and “S” at the same time
- Click and drag your mouse to highlight a certain area; the lighter section is what you are going to get on your screenshot
- Press “Save” to save the screenshot to your preferred location
- Press “Ctrl + C” to copy the image to paste it into a program or into Paint
Take a Screen Recording Using Game Bar
If you want to take a screen recording instead of just a screenshot, you can do so using the Game Bar. Most Windows 10 devices will have this to record videos in apps and programs.
To take a screen recording, do the following:
- Make sure that the Game Bar is enabled by searching for “Game Bar Settings” in your taskbar; once that pops up, you should toggle the “Record game clips, screenshots, and broadcast using Game Bar” option on
- When the overlay menu pops up, click on the camera icon to get a full-screen screenshot or record a video by pressing the record button
- If you want to include audio, be sure to click on the microphone option
All of your screenshots and video clips will be saved as PNG files to the Videos > Captures folder.
Take a Screenshot in Tablet Mode
If you are using your Asus laptop in tablet mode, you can use a simple tip to take a screenshot. All you have to do is press the Power Button and the Volume Up Buttons at the same time and quickly. The screen should flash quickly and your screenshot will save into the Pictures > Screenshot folder.
 This won’t work on Asus laptops that aren’t in tablet mode. It also won’t work in older devices from before 2018.
Screenshot Etiquette
There are some websites and apps that purposely don’t allow you to save their content so you can’t steal it. Taking a screenshot is a workaround for these settings. You want to ensure that you are following proper etiquette for screenshots at work and with copyrighted material. Someone can steal you for taking their image, video, or even idea from a screenshot.
If you do take a screenshot, be sure to include usernames, company information, URLs, and other source information so that you don’t get in trouble. It isn’t likely that you’ll get caught taking a screenshot of that skirt you like or a scene from a Netflix show, but it isn’t impossible either.
Never take screenshots of anything that you wouldn’t want shared, like personal messages, photos, account information, and more. The Cloud has been hacked before and all of this information could become public very quickly. Use your best judgment when taking screenshots.
Conclusion: It Is Easy To Take a Screenshot on Asus Laptop
It isn’t hard to take a screenshot on an Asus laptop, it just isn’t convenient until you learn the key combinations or find a program you like. If you are only taking screenshots randomly, you probably don’t have to download any specific software as what Windows provides is enough.
However, if you make screenshots for work or editing, it is a good idea to find a program you like. The two we mentioned in this article are two of the most popular, but there are many more out there. Find the one that you are comfortable with and it will be easy to get high-quality screenshots that you can edit, markup, and more.


