MSI Afterburner not working can be disappointing, especially if you really need to undervolt or overclock your computer. While you may have been able to install it on your PC, you may still experience issues like being unable to change clock speed on your device, an unresponsive game overlay, or the inability to open the tool.

Whatever the case might be, our experts have created a list of effective solutions, which we are going to share with you. Read on as we discuss the potential reasons why MSI Afterburner won’t open on your device and how to fix these problems.
Contents
- Reasons Why MSI Afterburner May Not Open on Your Computer
- How To Fix MSI Afterburner Not Working
- – Disable NVIDIA Overlay
- – Deactivate Steam Overlay
- – Uninstall and Reinstall MSI Afterburner
- – Add the Game Manually and Adjust the Detection Level to the Highest Level
- – Disable the Internal Graphics Unit in Your Computer
- – Running MSI Afterburner in Compatibility Mode
- – Activate Hardware Modification
- – Fix for Inactive Sliders
- Conclusion
Reasons Why MSI Afterburner May Not Open on Your Computer
There are a couple of reasons why MSI Afterburner may not open or work properly on your computer. While the tool works efficiently with both NVIDIA and AMD GPUs, one of the problems below might be the reason why your MSI Afterburner is not launching.
– Multiple Active Overlays
If there are multiple overlays running on your computer at the same time, you’re likely to experience an error in MSI Afterburner. Having various overlays running at the same time causes conflicts that can become too difficult for the tool to handle.
Steam and NVIDIA overlays are two of the most common reasons why this problem occurs. You may need to disable them so your MSI Afterburner can work effectively.
– Integrated Graphics Card
If you have a built-in graphics card on your device, you may experience MSI Afterburner not showing anything or some other related problem. In this case, you’ll need to provide your external graphics card with permission to handle all graphics-related tasks by disabling your built-in GPU in your device’s BIOS.
How To Fix MSI Afterburner Not Working
There are multiple ways to fix MSI Afterburner not overclocking or showing anything. We’ve created a list of these solutions to make sure you’re able to resolve the problem easily.
Without further ado, let’s get right into it:
– Disable NVIDIA Overlay
If you notice that your MSI Afterburner in-game overlay is not working correctly, disabling the NVIDIA overlay is one of the best methods you can try. Having multiple overlays running on your device while using the MSI Afterburner is bound to cause conflict.
Disabling one of these overlays can help you resolve the issue easily.
Here’s how to disable NVIDIA overlay on your device:
- Click on the search icon beside your start menu, search for GeForce Experience, and open the top result
- Once the GeForce Experience app is open, check the upper right corner of the home screen and select the gear icon to open the settings window
- On the settings window, click on the “General” tab and search for the “Share” option that allows you to stream, screenshot, record, and broadcast your gameplay
- Click and hold the slider under the Share option and move the slider all the way to the left to disable it
- Click on “Apply” to save the changes and launch your MSI Afterburner to see whether or not it’s working properly
– Deactivate Steam Overlay
Just like the NVIDIA overlay, Steam’s overlay can also cause your MSI Afterburner to malfunction. Disabling it can help you resolve why your MSI Afterburner is not working the right way.
Here’s how to disable the Steam overlay:
- Click on the search icon beside your start menu, search for Steam, and open the app on the top result
- You can also open the program through the desktop shortcut
- Once the program is open, go to the “Library” tab and search through the list of games in your library for the game you’re having a problem with
- Now, right-click on the game and select “Properties” from the context options
- On the Properties window, you’ll be on the “General” tab by default
- Find the “Enable the Steam Overlay while in-game” option and uncheck the box next to it
- Select “Apply” at the bottom of the screen and click on “Ok” to save the changes
- Now, run the MSI Afterburner to see if the overlay works during gameplay
– Uninstall and Reinstall MSI Afterburner
Another way to fix MSI Afterburner not overclocking on your computer is to uninstall the one on your device and reinstall the latest version.
You should try utilizing this solution before moving on to the more technical ones below:
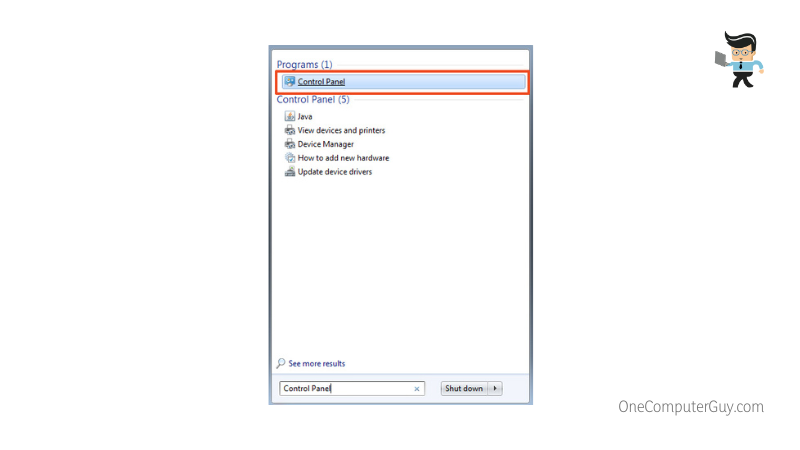
- Click on the search icon beside your start menu and search for “Control Panel”

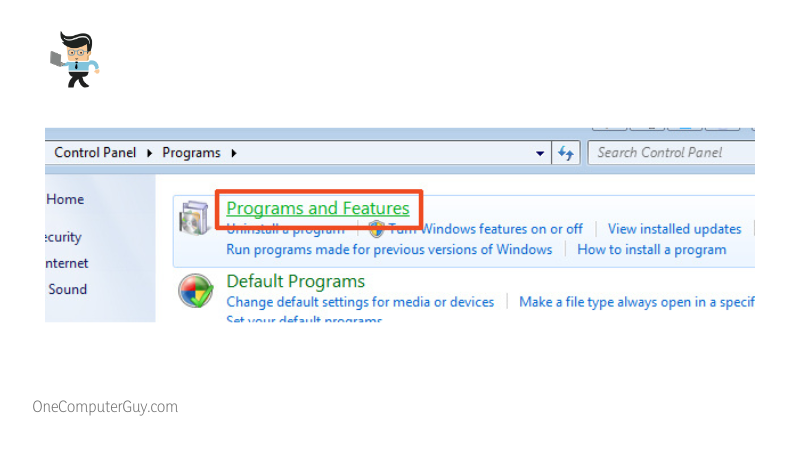
- Click on “Programs” then “Programs and Features”

- Search for MSI Afterburner on the list of apps
- Double-click it and follow the on-screen wizard to perform a complete uninstallation
- Restart your computer once the program has been uninstalled
- When your PC boots back up, go to MSI’s official page and download the latest version of Afterburner
- Install it and check to see if the newly downloaded version works correctly
– Add the Game Manually and Adjust the Detection Level to the Highest Level
If you’re experiencing MSI Afterburner not detecting GPU, manually adding your game’s executable file and adjusting its detection level to the highest can help you resolve the problem. You’ll need RivaTuner to deploy this solution effectively. This solution is highly beneficial to users whose afterburner overlay doesn’t show up in-game.
You can apply this solution by following the steps below:
- Double-click the RivaTuner shortcut on your desktop home screen to launch the app
- You can also use the search icon beside your start menu to search for the RivaTuner app and launch it from the top result
- In the RivaTuner window, check the bottom-left part of the screen for a plus sign
- Click on the plus sign and follow the on-screen instructions to add your game’s executable file
- Game executable files are often located in the C:Program Files (x86) directory
- After adding the executable file to RivaTuner, find it on the list available on the home screen
- Once you find the executable file, click on it and check the right panel for its application detection level
- There are four options available: None, low, medium, and high
- Set the game’s application detection level to “High” then check to see if MSI Afterburner works properly
– Disable the Internal Graphics Unit in Your Computer
MSI Afterburner not launching can be resolved by disabling the onboard GPU designed with your computer. After disabling the internal graphics unit, select your external graphics card as your main graphic device for graphical management.

Doing so should allow MSI Afterburner’s overclocking components to work properly, thereby fixing the problem you’re having.
Follow the steps below to disable your computer’s internal GPU:
- Shut down your computer if it’s on
- Now boot your PC into BIOS mode
- You can easily boot your computer into BIOS mode by pressing the key or combination of keys shown immediately after you turn on your computer
- The usual keys needed to enter the BIOS mode at startup are esc, the function keys, and Del key
- Simply take note of the notification at the lower left of your computer screen when you turn on your PC
- Once you’re in the BIOS mode, navigate to the “Security” tab
- Note that each motherboard manufacturer makes unique adjustments to their BIOS, so you may not find the option you need to change under the same name
- Now, once you’re in the Security section, use your computer’s arrow keys to scroll to the “Advanced” tab or one that’s similar if your BIOS doesn’t have an Advanced tab
- In the Advanced tab, locate the option with the tag “Onboard Devices Configuration”
- Select the “Primary Graphics Adapter” option and press enter
- Use your arrow keys to select your graphical unit
- Once you’re done, use the arrow keys to scroll to “Exit” and select “Exit Saving Changes”
- Your changes will be saved and your computer will reboot itself
- Once your computer is up and running, check to see if the MSI Afterburner works correctly
– Running MSI Afterburner in Compatibility Mode
This solution is ideal for both overclocking and overlay problems. Running your MSI Afterburner in compatibility mode allows the software to work flawlessly with older versions of Windows. Some users have reported it to work on newer versions of Windows as well so it’s worth trying when your MSI Afterburner is not working correctly.
Here are the steps you need to follow:
- Open your file explorer by pressing the Windows key and E button at the same time
- Navigate to the following directory: C:Program Files (x86)MSI Afterburner or wherever it is you saved the software during installation
- Find the main executable file, right-click on it, and select “Properties”
- On the Properties Window, click on the “Compatibility” tab
- Take a look at the option that says “Run this program in compatibility mode for:” to see if the box next to it is checked or not
- If the option is checked, uncheck it
- Go to the lower part of the window and check the box next to the “Run as administrator” option
- Confirm any dialog box that shows up and make sure the software now has admin privileges
- Click on “Apply” to apply the changes and “Ok” to save and exit the window
- Now, launch your MSI Afterburner to see whether or not it’s working properly
– Activate Hardware Modification
The ctrl and F buttons serve as a shortcut for accessing your fan speed control window. However, if your GPU is designed with fans and this shortcut doesn’t work, then your MSI Afterburner may be having some issues.

To fix this problem, all you need to do is:
- Open the MSI Afterburner interface
- Click on the settings button right from the home screen
- Navigate to the “Fans” tab
- If you cannot find a “Fans” tab in your settings, then that means that the software cannot detect your device
- Once you’ve clicked on the Fans tab, find the option with the “Enable user-defined software automatic fan control” tag
- Activate this option, save your changes and exit the Window
- Press the ctrl and F buttons simultaneously and check to see if the MSI Afterburner fan control comes up
Note that this solution will only work if your GPU is designed with its own fans. If your GPU has no fan, you may need to use a different third-party app to control any fan you may have installed in your system.
– Fix for Inactive Sliders
MSI Afterburner uses sliders to adjust things like core power consumption and core voltage. If the slider becomes inactive, it means the app either has a bug or hardware restriction. Uninstalling the app is the general fix for this issue. You can use the steps we’ve outlined above to uninstall the app.
However, if the MSI Afterburner sliders still don’t work after uninstalling and reinstalling the app, then it’s possible that your graphics card doesn’t have the means to allow you to change the core power consumption and core voltage for the processor. In this case, the sliders for these two components won’t work. Many integrated GPUs found in laptops tend to have this problem and there’s no way to resolve it.
Conclusion
That’s all on MSI Afterburner not opening and how to fix the problem. Here is a quick recap to make sure you have all you need to resolve the MSI Afterburner not detecting GPU:
- Multiple active overlays are likely to cause an error in MSI Afterburner
- Using an integrated graphics card as your default GPU can cause you to experience errors
- Disable your Steam and NVIDIA overlays to fix any overlay problem in MSI Afterburner
- Running the software in compatibility mode works for both overlay and overclocking issues
- Uninstalling and reinstalling the latest version of the MSI Afterburner is another effective solution you can try
MSI Afterburner is one of the best apps you can use for overclocking and overlays. You’ll be able to improve the performance of your computer, which in turn enhances the performance of your apps and games.
However, some of the potential problems the MSI Afterburner causes can be quite annoying. Fortunately, many of these problems are easy to fix with the solutions we listed above.


