We will look at how to check chipset driver version so you know what to do when faced with this confusing problem. Chipset drivers play an essential role in the functionality and compatibility of a computer system, which makes it a crucial component of every PC.
If you need to know the driver model of your chipset, we offer you step-by-step guidance in this article, so continue reading to learn more!
Contents
How To Check Chipset Driver Version?
– Check the Device Manager
This is a straightforward method of determining the types of drivers on your PC. Here is the step-by-step guide:
- Right-click on the “My Computer” icon near the start menu at the bottom left corner of your screen.
- When the pop-up window appears, scroll down to “Properties” and select it. This step opens up another pop-up window.
- Click on the “Hardware” tab and select “Device Manager.”
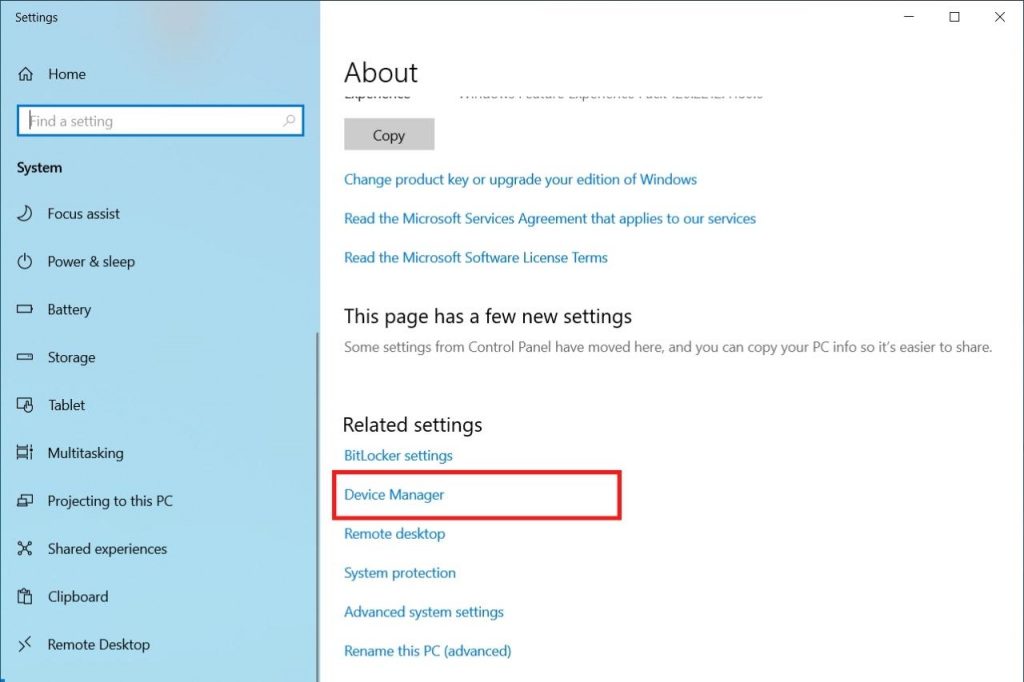
- Now find the “IDE ATA/ATAPI Controllers” and click on it to reveal a list of chipset brands.
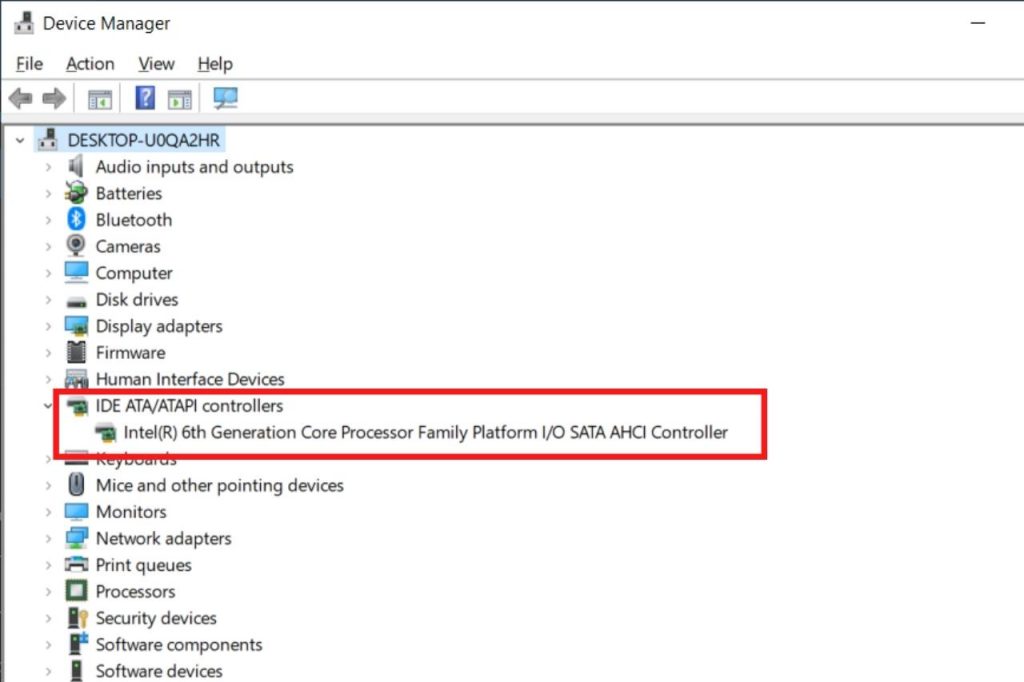
Alternatively, if you cannot find the chipset versions, you should consider searching for them under “System Devices.” Here is the general procedure:
- Press Windows + R keys to launch the run prompt.
- Type in or copy devmgmt.msc in the run box and press Enter.
- Expand the IDE ATA/ ATAPI controllers option .
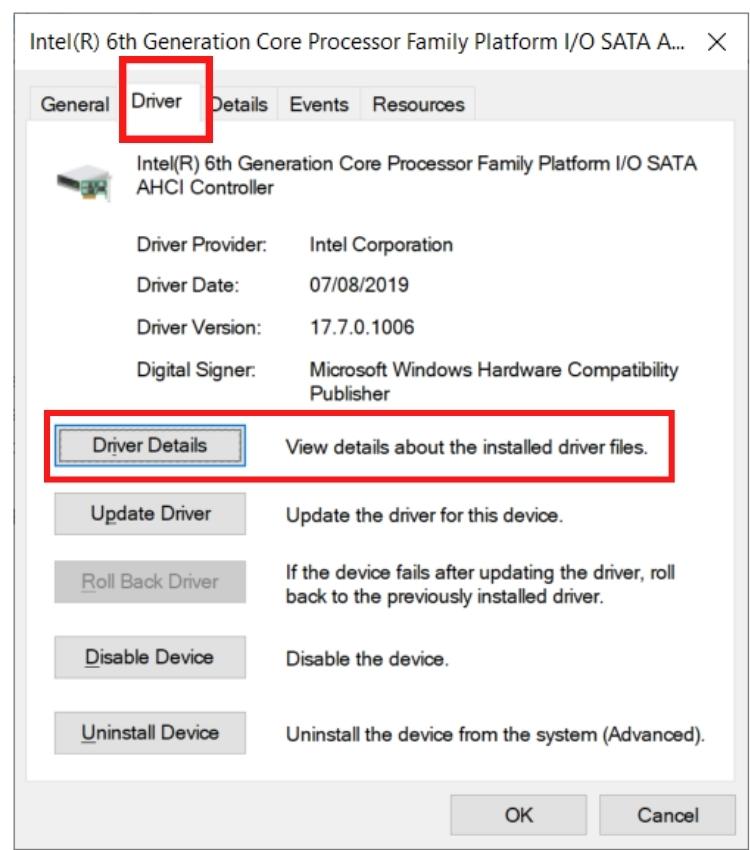
- Right-click on the driver’s name and choose Properties from the list. This action prompts a dialogue box to open.
- Click on the Driver Tab, and there you will see the version of your chipset.
While this method is one of the most straightforward techniques, it sometimes does not work for all chipset models. For instance, in certain cases, drivers for the chipset are not included in the list of chipset brands.
Also, if you want to know how to check intel chipset driver version windows 11, follow the above procedure.
– Check System Information
You can also determine the model of the driver chipset via the system information. This method lets you check the chipset model of all the drivers currently installed in your system.
Here are the steps to follow:
- Launch the Run Prompt Window by pressing Windows + R keys simultaneously.
- Copy and paste “msinfo32” in the box and press Enter.
- Expand Components on the left pane by clicking on the + symbol.
- Click on Display from the list. This action unveils comprehensive information about the driver. Check through the list of information for the Drivers.
Take note that at the bottom of that window is a search bar. You can type in the name of your driver brand to determine its version.
System Information for Windows offers super detailed information about several computer components. It will give you details about the software, hardware, and network components. It will also monitor the memory, CPU usage, and network traffic in real time.
– Install a New AMD Chipset Version
If you are explicitly trying to know what type of chipset model you have installed, this is one of the most foolproof methods, so if any other procedure fails, try this one.
When you update a driver model, AMD automatically detects the existing version. This allows you to select the latest version easily. But if you are not planning to update your chipset to the newest version, cancel the process once you determine the installed version. Let’s look at the procedure:
- Go to the AMD support page on your browser.
- Enter your device’s chipset model and subset, select the latest update for your driver, and download it. Ensure that you use the exact chipset model and download the drivers for your type of Windows operating system. Each chipset model has its specific drivers.
After successfully downloading the latest drivers, follow the below steps to install the updates:
- Launch the Device Manager by pressing Windows + X button and selecting it from the list.
- Expand the System Device.
- Right-click on the AMD chipset and select Update driver.
While installing the latest version, the system always tells you the version name and number so you can note it down.
– Check the Control Panel
The Control Panel also allows you to check the driver model of the chipset on your computer. Here is how to use it:
- Press Windows + S button and type Control Panel.
- Click on Control Panel when it pops up.
- Click on Programs>Programs and features.
- Scroll through the list to find Chipset Software and click on it.
After clicking on the software, check out the information on the entire row. The last column shows the latest installed version of the driver of your chipset.
– Through Apps and Features
Checking the version of your driver via the Apps & Features is another straightforward method you can employ. Here are the steps to follow:
- Press Windows + X button simultaneously on your keyboard.
- Click on Settings from the list.
- Click on Apps.
- Under the Apps & features tab, scroll down to locate the Chipset Software folder.
- Click on Chipset Software, and you will see the version number beneath the software.
If you search “how to check AMD chipset driver version Reddit,” users of this forum propose different methods of checking your chipset device driver model. However, many agree that this method is the most straightforward.
– Use Third-Party Apps
You can also use third-party apps if none of the above methods work. The standard apps you can use include:
AMD Radeon Settings App
If you have installed AMD’s Radeon software package, the app allows you to see the version of the chipset. The software package is helpful in some new systems with a single driver pack containing chipsets, graphics, and CPUs.
In this case, there is one version number in the package; however, looking at each device in the device manager will show different driver models. This explains why you cannot find the chipset package version installed on your system.
So the AMD Radeon Settings app can be the best alternative in determining your chipset’s package version. Here is how to do this: Launch the app>Software tab>Driver Package Version. You will see a number under the entry, which is the driver model number.
Snappy Driver Installer (SDI)
The Snappy Driver Installer is another App you can use to determine the version number of your chipset. Ideally, this app ensures you have the latest drivers installed on your system.
You can install the app on your PC and let it help you to find the latest model of the driver of the chipset on the AMD website and install it. From there, you can check the number. Whether you want to locate AMD chipset drivers or intel chipset drivers, you can use any of the above techniques.
How to Update Chipset Drivers?
There are various methods you can use to update these drivers such as going to the manufacturer’s website, using the command prompt, using third-party software, or updating Windows. Check them out in detail.

– Through the Manufacturer’s Website
Before updating the drivers, consult your motherboard manual to check the model and serial number. Now head over to the official Chipset website and download the latest drivers for your chipset. After the download is complete, execute the file and follow the installation prompts.
The drivers should support your current Windows operating system.
– Via Command Prompt
Microsoft has a built-in utility called PnPUtil.exe that offers massive capabilities for an administrator. With this utility, an administrator can add a driver pack and install, update and delete driver packages from the store.
Additionally, the utility lets you view lists of driver packs installed in the driver store. Here is how to use the utility:
- Download the package from the OEM website and install it.
- Run in it to install or update the drivers.
This method is more technical as it will require you to understand the PnPUtil Syntax and commands. For instance, when you want to add a driver pack, you will use the syntax:
pnputil /install x:\driver.inf
To add and install the driver bundle, use:
pnputil /install device.inf /install
To use the syntaxes above, you must launch the command prompt with admin rights and then paste the commands.
- Type cmd in the windows search box.
- When the Command Prompt appears, select “Run as administrator.”
- Paste the command.
– Use Third-Party Software
Third-party tools such as free Driver Update Software for Windows 11/10 PC can help you easily update your drivers quickly. To use the software, you will need to download it to your PC.
The software’s interface allows you to interact with it easily. Since you want to update the drivers, click on the update button and the software will automatically search for suitable drives from the manufacturer and install them.
– From Windows Update
You will often find chipset updates in the Windows Update section for the Windows operating systems. Nevertheless, they are usually accompanied as an “optional feature” and not a mandatory one.
Here is how to install them:
- In Windows 11: Navigate to Settings and select Windows Update. Choose Advanced Options > Optional updates.
- In Windows 10: launch the Settings app and select Updates & Security. Click on Windows Update and select View optional updates.
This section will find chipset device drivers to download and install. Check the box next to the drivers you want to install and click Install.
Installing New Chipset Drivers
You can uninstall the old chipset device drivers and reinstall new ones. This is a significant step in boosting your system’s functionality. If you own an AMD processor, use the steps below to install chipset drivers for your chipset:
- Go to the AMD support page on your browser.
- Select chipset using the Chipset selector.
- Provide details for your products correctly. Apart from the serial and model number, the operating system should be correct.
- Click Submit.
- Click download on the next page. Again, check to make sure you are downloading the correct drivers for your operating system.
- After the download process completes, execute the downloadable file and follow the prompts to install it.
Remember that not all systems can use these chipset device drivers. AMD state that systems with AMD Ryzen Chipsets, AMD Radeon Graphics, AMD Processors with Radeon Graphics, and AMD Radeon Pro Graphics are compatible with these drivers.
– Installing for Intel
If your device has an intel processor, follow the steps below:
- Launch the Intel website and go to the Download Center.
- Select Chipsets and specify the Chipset specification
- Click on the download button at the front
- After the download is complete, execute the file and follow the installation prompts.
- Restart your PC.
– Errors When Installing
The typical error you will encounter when installing drivers for your chipset is “Error 1316.” This error occurs because your antivirus might be running in the background. To fix the issue, you must disable the antivirus and the Windows Defender.
Another possible cause for this error could be the temporary files. Consider deleting the files before proceeding with the installation process. Use the procedure below:
- Launch the “Disk Cleanup” by pressing the Windows button, typing it, and clicking on it when it pops up.
- Let it run, and when it opens a dialogue box, select the Temp folder and any other files you delete and click “OK.”
These steps will delete all the temporary files and any other files you want to remove.
Also, some users may encounter an error “Windows cannot open the installation log file” when installing the new chipset device drivers. This common problem arises when Windows does not know where to save the log file.
C:\Users\\AppData\Local\Temp\MSIxxxxxx.log is the correct log file location, but Windows writes it to C:\Windows\System32.
To solve this issue, launch the task manager, stop the Explorer.exe process, and start it again.
What’s the Role of the Chipset Driver in a Computer?
The chipset driver in your computer manages communication between different computer components. For instance, the GPU, hard drives, and the processor rely on this driver. That makes it a crucial part of any computer system.

– Performs Different Roles
Chipsets are a layout of silicon-based electronic components that controls the communication between the devices and peripherals attached to the motherboard. This includes a processor (CPU), RAM, GPU, hard drive, etc.
A chipset device driver is a software that controls how the communication flows between these devices and between the operating system and the motherboard; hence, the term motherboard drivers. You can find these drivers in the following directories inside a Windows computer:
- C:\Windows\System32\DriverStore
- C:\Windows\System32\Drivers
- C:\WINDOWS\inf
– Offers Expansion Options
The hardware features of the chipset affect your options for expansion to get better graphics, faster connectivity, and more memory. A chipset uses two-way communication via “lanes.” The lanes enable communication between the chipset and other computer components.
Therefore, if a chipset has extra lanes, you can upgrade your system and get the expansion you want. Sometimes, when you update the system, you can automatically get these expansions.
– Allows Overclocking
Chipsets allow you to overclock your system. That means you can raise the clock rate of your computer to increase the speed of specific components or the entire system, so if you want to improve your system’s performance, you can overclock your system. However, take note that overclocking can void the manufacturer’s warranty.
Also, not all chips allow you to overclock the system.
– Can Be Updated
Update your motherboard chipset driver if your computer is not working correctly or if there is a new release. However, you may not need to update your drivers if nothing is critical. If something critical happens, it will appear via the Windows Update. But this is only possible if you haven’t disabled driver updates.
Take note that an OS comes with multiple chipset device drivers so you can start using your computer immediately. Because these drivers stipulate how the various components and peripherals will communicate with each other, each new update from the vendor includes improvements and fixes.
Therefore, updating this driver is essential for your device to work effectively.
Why Should I Know the Version of the Chipset Driver on My Computer?
The most important reason you should know the version of the driver on your chipset is because of compatibility. Software and hardware are constantly evolving and growing to meet the growing technological demands, so make sure that the chipset is compatible with your motherboard.
– Compatibility
Since the chipset facilities communication, it should be compatible with the motherboard. Besides, the motherboard and the chipset should keep up with technological advancements. Also, when you know the version of the driver, it becomes easier to ensure that all the components in your system are up to date. Updated systems make sure that your computer runs optimally.
Motherboard manufacturers regularly release updates to their chipsets to maintain the system’s stability and boost performance. The regular updates also ensure that their system is compatible with the new features and software that did not come with the original launch.
You should constantly check the driver model of your chipset to ensure you stay abreast with all releases. When there is a new release, ensure you download and install it to take advantage of the new features and capabilities.
Conclusion
Learning how to check chipset driver version can help you to detect new updates as soon as they are released. This will help you maintain your computer system in a high-performing state. We have taught you how to check the driver model, and here are the most important points we discussed above:
- The procedure for checking AMD and Intel chipset device driver models is similar. You can use third-party apps or the Apps and Features setting.
- If you want to check the chip device driver model for the version of the AMD chipset driver, install a new version of the driver.
- Understanding the installed version will help you select the best expansion option and allow overclocking of your system.
- Update your drivers with each new release to maintain better performance.
Hopefully, you can now check the version of drivers on your chipset and update and reinstall them when needed.


