
If your disk cleanup taking forever, you’ve come to the right spot.
The disk cleanup utility tool is a built-in Windows tool that helps users save space by cleaning up delivery optimization files, temporary files, thumbnails, old Windows files, Windows upgrade logs, and more.

We’ll be sharing information from our experts regarding how the disk cleanup tool works, the reason why Windows disk cleanup freezes sometimes, and the best way to resolve the problem.
How Long Does Disk Cleanup Take?
The time needed for the disk cleanup utility tool to do its work often varies across devices. However, you can expect it to take anywhere between 30 to 90 minutes. The reason why the utility tool takes so much time is that it often gets stuck on Windows updates files.
You see, when the disk cleanup tool starts the Windows update cleanup process, it carries out two distinct processes: deep clean and file compression.
– The Deep Cleaning Process
If you’re familiar with the “dism/online/cleanup-image/startcomponentcleanup” command line, then you’ll understand the first task the disk cleanup tool carries out when it’s working on the Windows update cleanup.
Essentially, the function above is known as “deep clean,” a process where the tool dives deeply into the system to look for components that aren’t being referenced.
Normally, there’s an automatic scavenging option in Windows that provides these components with a 30-day grace period before they are automatically removed. The automatic tool also has a self-imposed one-hour time limit, which means that it cannot run for more than one hour at a time. However, the command line above removes the need for the 30-day wait period and one-hour time limit to remove all of these data at once.
Since the disk cleanup tool uses a similar function, this means that it’ll remove every component that isn’t being used without waiting for the 30-day grace period, and it’ll continue doing so even if the timeframe for deleting the components exceeds the one-hour time limit.
– The File Compression Process
The second process the disk cleanup utility tool carries out when it gets to Windows Update Cleanup is to consult the “WofShouldCompress-Binaries” function to know whether or not your computer will find the compression of system files useful.
If it determines that the system will benefit from this process, it will start compressing your operating system’s files and once it’s done, it’ll store them in an alternate data stream known as the “WofCompressedData.”
The compression algorithm used here offers better quality when compared to a typical compression algorithm. However, you need to expend a lot of CPU time to carry out quality compression, which is why the disk utility tool utilizes a lot of CPU time when it gets to Windows Update Cleanup.
These two processes are usually the reasons why your Windows update cleanup takes forever.
Why Does Disk Cleanup Take So Long?
Besides the two processes explained above, there are other reasons why your disk cleanup freezes.
– Corrupt or Missing System Files

As we noted earlier, the disk cleanup tool is a built-in utility Windows tool. For this reason, it needs to have access to your system files to provide an efficient service. However, if one or more system files are missing or corrupted, the utility tool can encounter errors, which can make disk cleanup slow.
– Third-Party Software
Third-party software has been found to be the reason why many users experience disk cleanup stuck on temporary files or windows update cleanup. Factors such as conflicting files and drivers may cause the utility tool to encounter errors when cleaning your system.
How To Fix it
There are multiple ways to resolve why the disk cleanup utility tool is slow or freezing while purging windows update cleanup.
– Canceling the Process
The first solution is an obvious one. If your Windows disk cleanup gets stuck or takes forever to finish, click “Cancel” on the dialog box. The dialog box will close after a while. Once the dialog box is closed, run the disk cleanup utility tool again, but this time with administrator privileges.
When the disk cleanup tool launches, check to see if you’ll find the files it got stuck on, on the list of cleanup files. If they aren’t on the list, that means the cleanup was successful the first time. If they are on the list, move to the solutions listed below.
– Run the Windows Update Troubleshooter
If you have your Windows disk cleanup stuck on Windows Update Cleanup, then running the Windows Update Troubleshooter may be all you need to fix the problem. Just like the cleanup utility tool, the Windows troubleshooter is another built-in tool that helps diagnose system-related problems and tries to fix them automatically or offer effective solutions.
Follow the steps below to run the Windows troubleshooter:
- Click on your start menu and select the gear icon at the bottom left corner to open your system settings
- Alternatively, you can press the I button and Windows key simultaneously to open settings
- On the settings screen, choose “System” from the list of options
- Scroll down to the “Troubleshoot” option and click on it
- Choose “Other troubleshooters” from the list of provided options on the right panel
- Search for “Windows Update” on the next screen and click on “Run”
- Doing this will run the troubleshooter, which will scan your device and attempt to repair any system issues
- After the troubleshooter has finished running, try running the disk cleanup utility tool again to see if the problem has been resolved
– Delete Your Windows.old Folder
When you upgrade your operating system, Windows stores the older version you were using in a folder known as the Windows.old folder. The reason why it does this is to make it easy for you to revert to the previous version anytime you want to.
However, if the contents in this folder are corrupted or have issues, they can cause your Windows update cleanup to take forever. You’ll need to delete the entire folder to resolve this issue.
There are two different ways to delete the Windows.old folder.
– Delete Windows.old Through Your Windows File Explorer
You can delete Windows.old using your file explorer.
The steps you should take, are:
- Press the Windows key and E button at the same time to open your Windows file explorer
- Type or copy and paste this file path into the search bar: C:Windows.old

- You’ll be taken to the file directory
- Right-click on the folder and select “Delete” from the list of options
– Delete Windows.old Through the Command Prompt
You can also use Command Prompt to remove Windows.old.
Here is an easy way to do that:
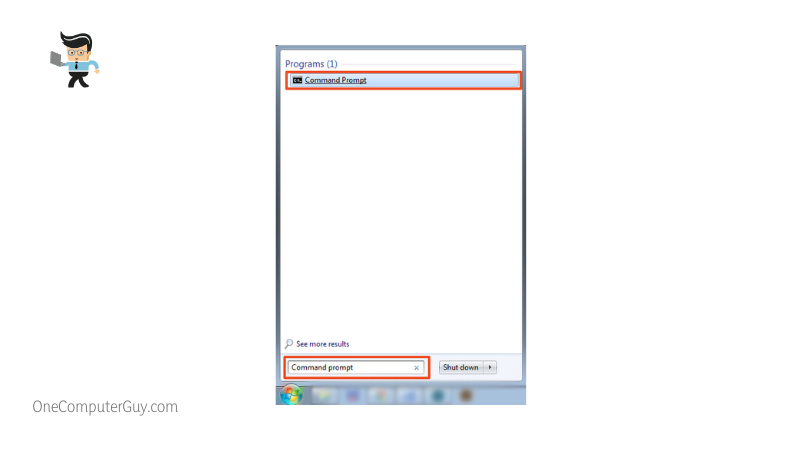
- Click on the search icon beside your start menu button and search for command prompt
- Choose Command Prompt (Admin) from the list of options

- Alternatively, you can right-click on your start menu button and select Command Prompt (Admin) or Windows Terminal (Admin)
- In the command prompt window, type in the command: “takeown /F C:Windows.old* /R /A”

- The command above will help you remove any kind of ownership fixed on the folder
- Next, type in or copy and paste the following command: “cacls C:Windows.old*.* /T /grant administrators:F”

- Once that’s done, copy and paste this command: “rmdir /S /Q C:Windows.old*.*”

- The last command above will help delete the Windows.old folder permanently
– Deleting the Software Distribution Folder
Windows uses the SoftwareDistribution folder to store Windows update files before installing the files on your computer. Sometimes, the files in this folder become corrupted and they make it difficult for users to run or finish the disk cleanup. Deleting the contents of this folder can help you resolve this issue.
Here’s how:
- Press the Windows key and E button at the same time to launch your Windows Explorer
- Navigate to the following directory: “C:WindowsSoftwareDistribution”

- Double-click on the folder, select all the sub-folders, right-click on them, and select “Delete” from the list of options

- Once you’re done, try the disk cleanup utility tool again
– Run SFC and DISM
As we noted above, missing or corrupted system files can cause your disk cleanup to take forever. In cases like this, you want to use the system file checker (SFC) and Deployment Image Servicing and Management (DISM) tools to scan for and possibly repair the corrupted files.
And if there’s any file missing on your computer, these tools will try to replace it so you can have a smoother experience. Follow the steps below to utilize the SFC and DISM tools.
– How To Run SFC
If you choose to run SFC to check your files, just follow the instruction below:
- Right-click on your start menu and select Command Prompt (Admin) or Windows Terminal (Admin)
- Enter the following command into the command line: sfc/scannow

- Press enter and wait for the tool to finish scanning for and repairing the missing or corrupted files
- If there’s nothing wrong with your system files, you’ll get the following message: “Windows Resource Protection did not find any integrity violations”
- If there are problems that were fixed, you’d get the following message: “Windows Resource Protection found corrupt files and successfully repaired them. Details are included in the CBS.Log %WinDir%LogsCBSCBS.log”
– How To Run DISM
There is another option for checking your files and repairing the ones that are damaged:
- Click on the search icon beside your start menu and search for “Command Prompt”
- Choose Command Prompt (Admin) from the list of options to open the command prompt with elevated privileges
- Once the command line is open, enter the following command: Dism /Online /Cleanup-Image /CheckHealth

- The command above allows the command prompt to check whether or not there’s a problem with your disk image
- If the command prompt returns any kind of error that shows that your disc image is corrupted, you’ll need to enter the following command: Dism /Online /Cleanup-Image /ScanHealth

- This command can take between five and 20 minutes to completely scan your computer
- The scan can freeze at some point, usually 20 percent; this is normal
- Once the scan has been completed, enter the command below to fix your disk image: Dism /Online /Cleanup-Image /RestoreHealth
- Note that this repair can take anywhere from 20 minutes to four hours, depending on the corruption and size of your disc image
- Once the repair is complete, try running your disk cleanup again
– Run the Windows Disk Cleanup in Safe Mode
If your disk cleanup is taking forever because of a third-party program, booting your computer into safe mode and running the disk cleanup tool can help fix the problem. In safe mode, your computer will have limited features and most third-party apps will be disabled. This way, you’ll be able to carry out your disk cleanup with no hassle.
Here’s how to boot your computer into safe mode:
- Click on your start menu and select the power icon
- While pressing down the shift key, click on “Restart”
- Your PC will restart and boot into a blue screen with multiple options
- Select the “Troubleshoot” option, then click on “Advanced options”
- On the next window, select “Startup settings” then choose “Restart”
- Your PC will restart again and boot into a new screen with multiple options
- Press “4” if you want to boot into safe mode with no internet
- Press “5” if you want to boot into safe mode with internet access
- Once the PC boots into safe mode, go to your disk cleanup menu and try the process again
Conclusion
That’s all on why disk cleanup takes forever and how to speed things up. Here are some points to keep in mind when trying to fix why your disk cleanup takes forever:
- The disk cleanup utility tool uses a form of deep cleaning and file compression to free up space on your computer
- Missing or corrupt files can cause the disk cleanup tool to get stuck
- Some third-party apps can cause conflicts with the disk cleanup utility tool, thereby causing it to get stuck
- The Windows Troubleshooter can help you diagnose your system and automatically fix why your disk cleanup is slow
- Running the disk cleanup tool in safe mode can help you fix the problem
Windows disk cleanup is an ideal utility tool that’ll help you free up space. While it may not be as fast as some third-party apps, it’s quite efficient at freeing up space. Whether your disk cleanup is stuck on windows updates or temporary files, following the steps outlined above is sure to help you resolve the problem. And while it may still take some time, you’ll also be able to reduce the time needed for the cleanup to be completed.


