Checking for the Dial-Up Adapter |
|
|---|---|
| 1. | When you click on My Computer, make sure you have a Dial-Up Networking icon. |
| 2. | If you already have one installed, go to the bottom on this page and click on Adding and Configuring the TCP/IP Protocol |
| 3. | If not, continue to the next section, Adding the Dial-Up Adapter |
 |
|
Adding the Dial-Up Adapter |
|
|---|---|
| 1. | Open up the Control Panel |
| 2. | Click on Add/Remove Programs |
| 3. | Click on the Windows Setup tab |
| 4. | Double click on Communications |
| 5. | Select Dial-Up Networking |
| 6. | Click on the OK button |
| 7. | Reboot if requested |
Confirming the
|
|
|---|---|
| 1. | Open up the Control Panel |
| 2. | Click on the Network icon |
| 3. | The default setting should look like the panel below |
 |
|
| 4. | If you do not need Client for Netware Networks:
|
Adding TCP/IP Protocol |
|
|---|---|
| 1. | Click on the Add button |
| 2. | Click on Protocol |
| 3. | Click on Microsoft |
| 4. | Click on TCP/IP |
| 5. | Highlight NetBEUI – Click on Remove |
| 6. | If you are not using Netware, highlight IPX/SPX – Click on Remove |
| 7. | Click on OK and reboot if necessary |
| 8. | Your Network Setup should look like: |
 |
|
Configuring TCP/IP Protocol |
|
|---|---|
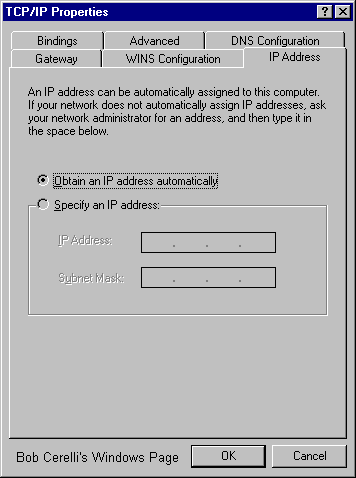
| 1. | Click on TCP/IP |
| 2. | Configure the screen as follows: |
 |
|
| 3. | No other IP address information needs to be entered. You will configure your DNS IP address in the next section. |
Configuring the Dial Up Connection |
|
|---|---|
Adding a New Dial-Up Icon |
|
| 1. | Click on the My Computer icon |
| 2. | Click on the Dial-Up Networking Icon |
| 3. | Click on the Make New Connection icon |
| 4. | Type in the Name of your provider |
| 5. | Click on Next |
| 6. | Type in the Area Code and Phone Number of your provider |
| 7. | Click on Finish |
Configuring the Dial-Up Icon |
|
|---|---|
| 1. | Right click on the icon you created |
| 2. | Click on Properties |
| 3. | If you need to type anything other than your name and password:
When you get it all working, you can write a script to automate this working. See the section Dial-Up Scripting |
| 4. | Click on Server Type |
| 5. | Have the settings as follows the click on OK |
 |
|
| 6. | Click on TCP/IP Settings and enter in the specific IP (if required) and DNS addresses (is required). If you have multiple Internet Service Providers, you can have each one with it’s own specific settings. |
Dialing In |
|
|---|---|
| 1. | Click on the icon you created |
| 2. | If you don’t need to bring up a Terminal Window After Dialing:
Note: If your Save Password box is grayed out, you did not install Client for Microsoft Networks as part of your network setup. If you find it going back to being grayed out, download the Password List Update (278 K) from Microsoft. |
| 3. | If you need to bring up a Terminal Window After Dialing, just click on Connect. You will be entering your Login Name and Password in the Post-Dial Terminal Screen shown below. |
 |
|
This site is copyrighted. No portion may be reproduced without my written permission.


